Have you ever walked into a luxury hotel bathroom and wished your own space felt just as relaxing and elegant? The good news is that you don’t need a complete $10,000 renovation or a massive contractor budget to achieve that upscale look. By focusing on high-impact, functional DIY upgrades and real engineering adjustments, you can transform an outdated bathroom into a boutique hotel sanctuary on a weekend budget.
Here is a practical, step-by-step structural guide to upgrading your old bathroom, based on real-world installation metrics and common DIY troubleshooting.
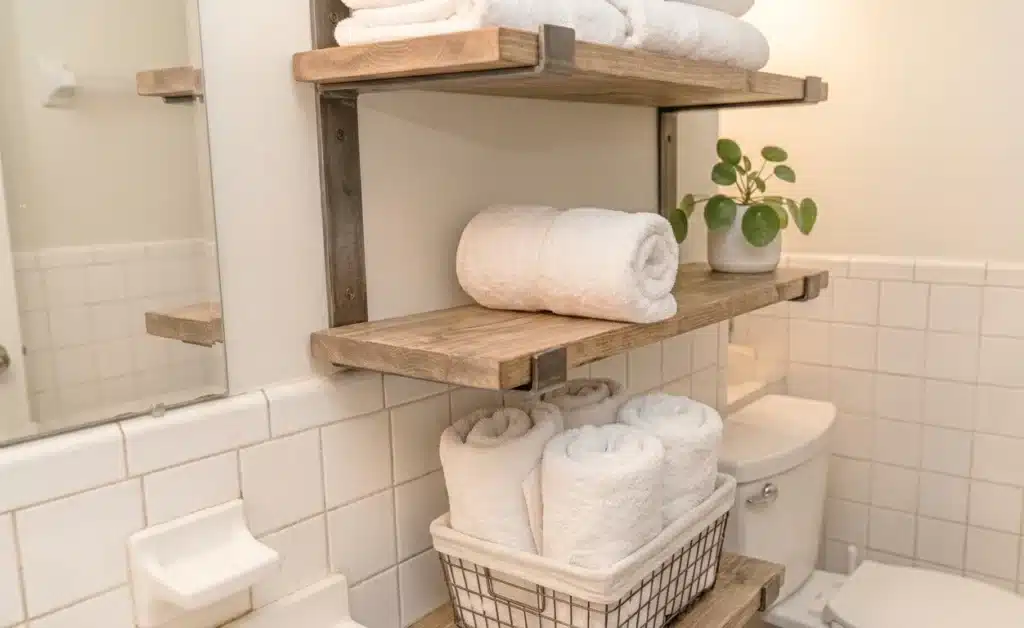
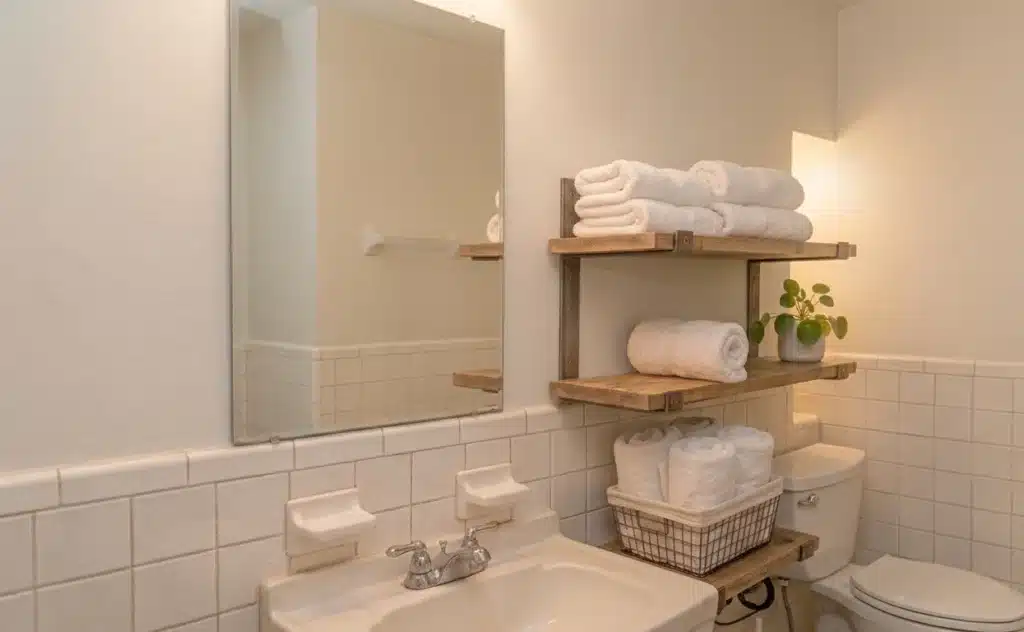
1. Upgrade to Hotel-Grade Linens (And Manage the Microclimate)
The quickest way to mimic a luxury spa is by swapping out mismatched, faded towels for plush, high-density white towels (ideally 600+ GSM 100% Egyptian cotton). White conveys a clean, timeless appearance that instantly feels premium and hyper-hygienic.
However, the real secret lies in how you store them. In a standard residential bathroom, storing towels inside a closed cabinet traps moisture, leading to a musty smell.
- The DIY Fix: Install a heavy-duty, wall-mounted open metal shelf or a minimalist towel ladder directly over your toilet or adjacent to the shower.
- The Practical Metric: When mounting the shelf, bypass the drywall anchors and screw directly into the wall studs using a stud finder and 2.5-inch wood screws. This ensures the shelf won’t sag when holding heavy, rolled wet towels. Rolling them tightly—rather than folding—maximizes airflow and keeps them dry.
2. Swap Out Builder-Grade Hardware (The 45-Minute Valve Switch)
Outdated chrome faucets, rusted showerheads, and old plastic cabinet handles instantly date a space. Replacing these with matte black or brushed brass fixtures delivers a surprisingly dramatic, custom-made aesthetic.
- Before You Buy: You must identify your current sink configuration. Measure the distance between the holes. If it’s 4 inches, you need a Centerset faucet; if it’s 8 inches or wider, you need a Widespread faucet. Buying a single-hole faucet for a 3-hole sink requires a matching deck plate (escutcheon) to hide the extra plumbing holes.
- Step-by-Step Installation Guide:
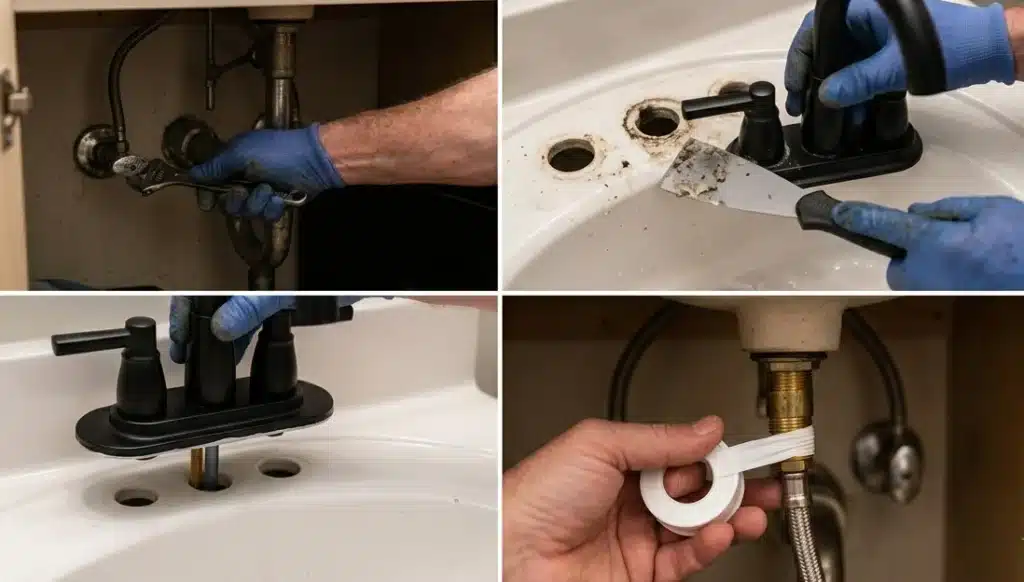
- Locate the dual shut-off valves (water supply lines) underneath the sink and turn them completely clockwise to cut the water.
- Use an adjustable wrench to disconnect the hot and cold water lines from the old faucet shank.
- Clean the mineral buildup around the sink holes with a plastic scraper and white vinegar before placing the new hardware.
- Crucial Step: Wrap Teflon tape (plumber’s tape) around the male pipe threads 5 to 6 times in a clockwise direction. This prevents microscopic water leaks behind your drywall. Tighten the mounting nuts underneath securely with a basin wrench.
3. Correct the Color Temperature and Layer Your Lighting
Harsh, glaring overhead fluorescent lighting makes a bathroom feel cold, flat, and sterile. Luxury hotels utilize layered lighting to create depth and soften dark corners.
- The Lighting Spec: Switch your existing bulbs to warm-white LED bulbs rated at 2700K to 3000K. Do not go below 2700K (too yellow/dark) or above 4000K (too sterile/blue). Look for bulbs with a high CRI (Color Rendering Index) of 90+ so colors look accurate in the mirror.
- The Practical Setup: If you rent or cannot rewire the walls, do not hack into the drywall. Instead, source two battery-operated, rechargeable LED wireless wall sconces. Mount them at eye level (roughly 60 to 65 inches from the floor) on both sides of your mirror using heavy-duty 3M Command strips. This creates an even, shadow-free cross-illumination perfect for your morning routine, completely eliminating harsh downward shadows.
4. Eliminate Visual Noise with Structural Organization

Luxury hotel bathrooms feel exceptionally calm because they strictly limit visual clutter. Countertops are kept clear of daily toiletries, electric toothbrush cords, and plastic product bottles.
- The Tray Zoning Method: Grouping loose items onto a single surface makes a mess look intentional. Utilize a heavy marble, ceramic, or faux-stone tray on your vanity counter. Keep only three items visible: a premium amber glass soap dispenser, a small scented candle, and your primary daily skincare bottle.
- The Cabinet Hack: Move everything else (toothpaste, razors, medication) inside drawers or into uniform, stackable clear plastic bins hidden underneath the vanity. Group your items by category (e.g., “Dental,” “Shaving,” “First Aid”). The less random packaging your eyes have to process, the larger and more premium the room will naturally feel.
5. Introduce High-Humidity Boutique Elements
The final styling touches bridge the gap between residential utility and a luxury boutique retreat. However, because bathrooms are high-moisture environments, you must choose materials that won’t warp, mold, or rust.
- Biophilic Design (The Plant Choice): Do not put delicate plants in a windowless bathroom. Instead, place a small pot of Snake Plants (Sansevieria) or a Boston Fern on a corner shelf. These species thrive on high humidity and low-light conditions, actively absorbing excess moisture from your morning showers.
- The Hardware Details: Swap out your plastic trash can for a matte-finished stainless steel pedal bin. Replace a soggy, standard fabric bath mat with a fast-drying Diatomaceous Earth (stone) bath mat or a solid teak wood slatted mat. Wood and stone elements introduce a natural texture that breaks up the coldness of traditional ceramic tiling.
The Bottom Line
Transforming an old bathroom doesn’t require tearing down drywall or hiring expensive contractors. By focusing on precise, actionable upgrades—calculating your faucet hole specifications, correcting light temperatures to 2700K, wrapping thread connections with Teflon tape, and zoning your vanity with heavy stone trays—you completely shift the space’s functionality and luxury.
Pick just one of these DIY projects this weekend to start building your own luxury retreat. Sometimes, the smallest technical adjustments yield the most premium impacts.
What’s your current setup?
Are you dealing with a 4-inch centerset or a single-hole sink configuration? If you are stuck trying to figure out how to disconnect an old rusted plumbing line under your vanity, leave a comment below with your setup details—I’ll help you troubleshoot the tools you need!